
Blog chia sẻ kinh nghiệm lập trình Android
Chào các bạn, bài trước mình đã hướng dẫn các bạn làm quen và sử dụng checkbox hôm nay mình sẽ hướng dẫn các bạn một loại chọn nữa là radio button.
Radiobutton thường được đưa ra 2 hoặc nhiều hơn hai phần tử trong đó người dùng chỉ được chọn một thứ , để làm được như vậy chúng ta cần nhóm chúng vào một nhóm đó chính là GruopRadiobutton để khi người dùng chọn thì chỉ chọn được duy nhất 1 radiobutton.
Bài hôm nay mình sẽ hướng dẫn các bạn cách tạo và dùng Radiobutton và Gruop nó một cách đơn giản nhất.
Các bạn tạo cho mình một project mình tạo có tên là Demo_radiobutton1;
activity_main.xml
<LinearLayout xmlns:android="http://schemas.android.com/apk/res/android"
android:layout_width="fill_parent"
android:layout_height="fill_parent"
android:background="#000034"
android:orientation="vertical" >
<TextView
android:id="@+id/textView1"
android:layout_width="fill_parent"
android:layout_height="wrap_content"
android:gravity="center"
android:text="Demo Radiobutton"
android:textColor="#ffffff"
android:textSize="30dp" />
<TextView
android:id="@+id/textView2"
android:layout_width="fill_parent"
android:layout_height="wrap_content"
android:layout_marginTop="22dp"
android:text="Chọn Loại Mạng"
android:textColor="#ffffff"
android:textSize="22dp" />
<RadioGroup
android:id="@+id/rdoGroup"
android:layout_width="fill_parent"
android:layout_height="wrap_content"
android:background="#FF6534" >
<RadioButton
android:id="@+id/rdo2g"
android:layout_width="fill_parent"
android:layout_height="wrap_content"
android:text="RadioButton" />
<RadioButton
android:id="@+id/rdo3g"
android:layout_width="fill_parent"
android:layout_height="wrap_content"
android:layout_marginTop="15dp"
android:text="RadioButton" />
</RadioGroup>
<TextView
android:id="@+id/tvshowinfor"
android:layout_width="fill_parent"
android:layout_height="wrap_content"
android:layout_marginTop="15dp"
android:background="#0FF453"
android:text="Thông tin: " />
<LinearLayout
android:layout_width="match_parent"
android:layout_height="wrap_content"
android:layout_marginTop="25dp"
android:orientation="horizontal" >
<Button
android:id="@+id/btok"
android:layout_width="match_parent"
android:layout_height="wrap_content"
android:layout_weight="5"
android:text="Ok" />
<Button
android:id="@+id/btexit"
android:layout_width="match_parent"
android:layout_height="wrap_content"
android:layout_weight="5"
android:text="Thoát" />
</LinearLayout>
</LinearLayout>
Trong đó :
<RadioGroup
android:id="@+id/rdoGroup"
android:layout_width="fill_parent"
android:layout_height="wrap_content"
android:background="#FF6534" >
<RadioButton
android:id="@+id/rdo2g"
android:layout_width="fill_parent"
android:layout_height="wrap_content"
android:text="RadioButton" />
<RadioButton
android:id="@+id/rdo3g"
android:layout_width="fill_parent"
android:layout_height="wrap_content"
android:layout_marginTop="15dp"
android:text="RadioButton" />
</RadioGroup>
đây chính là 2 radiobutton mình tạo ra , được bao gói trong RadioGroup , nếu không có RadioGroup thì các RadioButton sẽ không có liên kết với nhau, như vậy lại giống như checkbox.
Tạo 1 button để lấy giá trị mà người dùng chọn Radiobutton
<Button
android:id="@+id/btok"
android:layout_width="match_parent"
android:layout_height="wrap_content"
android:layout_weight="5"
android:text="Ok" />
Tiếp đó lấy event của button Ok hiển thị thông tin chọn lên textview :
<TextView
android:id="@+id/tvshowinfor"
android:layout_width="fill_parent"
android:layout_height="wrap_content"
android:layout_marginTop="15dp"
android:background="#0FF453"
android:text="Thông tin: " />
Giao diện của đoạn code trên như sau :

Xử lí trên Mainactivity.class
Khai báo các phần tử bên main_activity.xml

Mình tạo tiếp các phương thức của button ok và button exit:


full code MainActivity.class
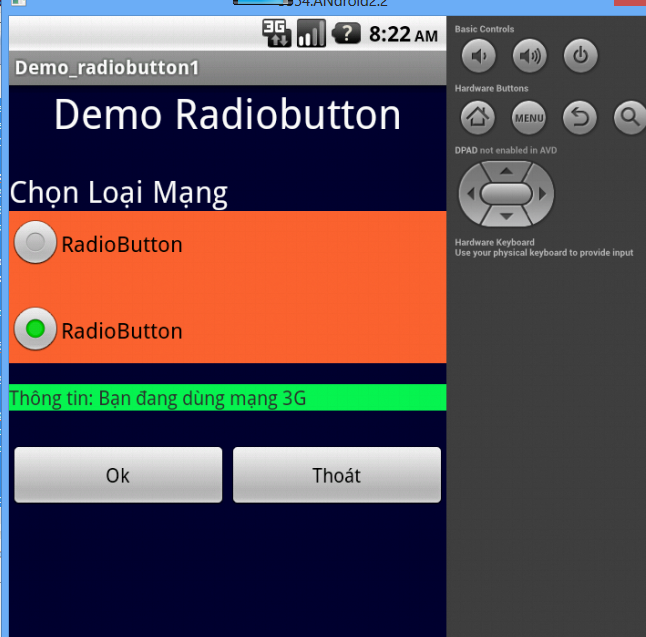
Bạn Run app sẽ được ứng dụng có hình như bên dưới.

Các bạn test thử các sự kiện. khi chạy ứng dụng thì radiobutton 2G được chọn ngay đầu tiên vì mình đã để mặc định là 2G được chọn bằng lệnh :
// để mặc định là mạng 2g thì để radiobutton 1 được chọn trước
rdo2g.setChecked(true);
Khác với checkbox , với Radiobutton bạn chỉ cần có Group nó lại là nó sẽ chọn 1 trong số các radiobutton rất đáng chú ý phải không các bạn.
Đây là hình ảnh chạy của ứng dụng :

CLICK BUTTON OK
CLICK BUTTON OK

CLICK BUTTON THOÁT
Bài sau mình sẽ hướng dẫn các bạn dùng event của radiobutton luôn, không thông qua event của Button nữa,
bài học hôm nay tới đây là kết thúc, hi vọng các bạn thấy có ích và vận dụng nó vào ứng dụng của mình thật tuyệt vời.
Mọi thắc mắc các bạn liên hệ mình qua địa chỉ Gmail : svk10acntt@gmail.com hoặc Fb: John Ly Phạm
package com.example.demo_radiobutton1;

import android.app.Activity;
import android.app.AlertDialog;
import android.content.Context;
import android.content.DialogInterface;
import android.os.Bundle;
import android.view.View;
import android.view.View.OnClickListener;
import android.widget.Button;
import android.widget.RadioButton;
import android.widget.RadioGroup;
import android.widget.TextView;

public class MainActivity extends Activity {

 Button btok,btexit;
 Context context= this;
 RadioButton rdo2g,rdo3g;
 TextView tvshowinfor;
 RadioGroup group ;
 @Override
 protected void onCreate(Bundle savedInstanceState) {
  super.onCreate(savedInstanceState);
  setContentView(R.layout.activity_main);

  // khai báo id
  rdo2g=(RadioButton)findViewById(R.id.rdo2g);
  rdo3g=(RadioButton)findViewById(R.id.rdo3g);
  group=(RadioGroup)findViewById(R.id.rdoGroup);

  btexit=(Button)findViewById(R.id.btexit);
  btok=(Button)findViewById(R.id.btok);

  tvshowinfor=(TextView)findViewById(R.id.tvshowinfor);

  // để mặc định là mạng 2g thì để radiobutton 1 được chọn trước

  rdo2g.setChecked(true);

  // gọi các phương thức
  method_exit();
  method_infor();
 }

 // method okinfor
 public void method_infor()
 {btok.setOnClickListener(new OnClickListener() {

  @Override
  public void onClick(View arg0) {
   if(rdo2g.isChecked())
   {
    tvshowinfor.setText("Thông tin: "+ "Bạn đang dùng mạng 2G");
   }
   if(rdo3g.isChecked()){
    tvshowinfor.setText("Thông tin: "+ "Bạn đang dùng mạng 3G");
   }

  }
 });
 }
 //mothod exit
  public void method_exit()
  {
   btexit.setOnClickListener(new OnClickListener() {

  @Override
  public void onClick(View v) {
   AlertDialog.Builder builder = new AlertDialog.Builder(context);
   builder.setTitle("thoát");
   builder.setNegativeButton("không", null);
   builder.setNeutralButton("có", new DialogInterface.OnClickListener() {
    @Override
    public void onClick(DialogInterface dialog, int which) {
     // TODO Auto-generated method stub
     System.exit(0);// thoát ứng dụng
    }
   });
   builder.show();// gọi dialog khi clik button ok
  }
 });
  }
}

0 comments:
Post a Comment
http://knlaptrinhandroid.blogspot.com/